How to Repair Stripped Spark Plug Threads: Auto Clinic
- Share
- Issue Time
- May 3,2017
How to Repair Stripped Spark Plug Threads: Auto Clinic
Spark plugs that haven't been changed for a long time can become one with the cylinder head. Fortunately, it's possible to repair damaged threads instead of scrapping the head.
Q: Yesterday I was driving home and a spark plug blew right out of the cylinder head. The car was towed to the shop where I'd had a tuneup the day before -- which included changing the spark plugs. The mechanic said he could repair the threads, but my uncle says the cylinder head is ruined and the mechanic should replace it at his expense. The car has about 100,000 miles. Thoughts?
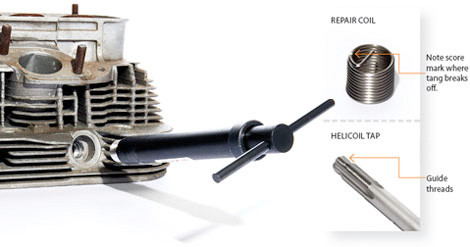
A: There are a number of ways to repair stripped threads. In fact, it may be possible to simply chase the old threads with a tap and clean them up. Or, as illustrated, you can insert a Helicoil. There are several types of repair inserts, but we prefer Helicoils. I'd give your mechanic a shot at fixing the threads before I held his feet to the fire. When a spark plug has had a chance to marry a cylinder head for 100,000 miles, it's not uncommon for the aluminum threads to come out of the head with the plug. (I pull and inspect plugs every couple of years and reinstall them with a small dab of antiseize compound, but that's another column.)
A proper thread repair should last as long as the life of the car. This type of repair can be used for almost any threaded fastener, by the way. And that includes cast-iron, steel and aluminum parts. Warning: Installing a Helicoil or other threaded insert looks simple -- but it's not. Any readers out there who wish to attempt it might want to practice a couple of times on scrap parts.
Start by threading the special Helicoil tap into the remaining threads in the head. This is to ensure the new threads are concentric and parallel with the originals. Continue threading the tap in to cut the new, oversize threads. To avoid getting aluminum chips in the cylinder when retapping the threads, you should coat the tap with grease. The chips will stick to the grease and come back out with the tap. Back out the chip-laden tap, and clean up any remaining chips.
I've also filled the cylinder (before tapping the hole) with oil-soaked clothesline to catch any chips -- but that was in a racing engine with a squish band only a few thousandths of an inch deep. Street engines with a more normal compression ratio should be fine if you are careful, and blow the chips out with compressed air. Mostly, you don't want any chips to find their way out the exhaust port and wind up in the catalytic converter.
Now you can thread the appropriate-length coil over the installation mandrel. There's a raised flat on the mandrel that will catch on the tang in the coil, allowing you to thread the coil into your new threads. The coil is a little bit bigger than the threads, which will keep it in place when you're finished. The tang will pull the coil into place from the inner end. Once the coil is in place, remove the mandrel.
Now, use a pair of needle-nose pliers to break the tang off. It's prescored to break off cleanly and easily. Do NOT drop the tang into the cylinder! A few aluminum chips will not damage your engine, but a 1/2-in.-long piece of sharp stainless steel wire will tattoo the top of your piston and the combustion chamber before it finally gets out past the exhaust valve.