How to Remove flywheel with pullers and extractors
- Share
- Issue Time
- Apr 8,2020
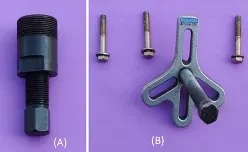
On the left (A) is a typical flywheel extractor. | |
| On the right (B) is a three bolt puller. |
Special tools are essential for certain jobs on classic motorcycles. One job, in particular, is removing the flywheel from the end of the crankshaft.
Typically, the flywheels on motorcycles are held in place by a taper. Both the crankshaft and the flywheel have a machined tapered interface that locks the two components together when a retaining bolt or nut is tightened.
To locate a flywheel, a Woodruff key is used. However, it should be noted that the Woodruff key is not intended to stop the flywheel from rotating, but to fix its position for ignition timing purposes.
Removing a flywheel from a motorcycle will require the use of an extractor or puller. Many flywheels have a threaded center section for the location of a specific puller (see 'A' in the photograph). Other designs require the use of a bolted plate with a large center bolt that draws the flywheel off as it is tightened (item 'B' in the photograph).
Occasionally it is possible to remove a flywheel with a universal extractor such as a three-legged puller. However, small flywheels rarely have sufficient clearance for the legs to pass through.
Before the flywheel extractor is located, the retaining center nut or bolt must first be removed. To facilitate the loosening process of the retaining nut, it is necessary to stop the flywheel from rotating. Most manufacturers have a special tool available for this purpose.
Note: The temptation to place a large screwdriver (or similar) into the flywheel must be resisted at all costs. The electrical components inside the flywheel will be irreparably damaged by this method.
An alternative to a flywheel holding tool when un-tightening the center nut is to use a gloved hand to hold the flywheel while an air powered impact gun is used. However, this method must be approached with caution as the impact gun will try to spin the flywheel.
Checking the Thread Direction
Before attempting to loosen the center nut, the mechanic must ascertain the thread direction; that is, left or right handed threads. Typically, flywheels are designed to rotate in the opposite direction of the threads holding them in place. For instance, a flywheel center nut on the left side of an engine that rotates anti-clockwise when viewed from the left side will have a center nut with standard right-hand threads. (Careful examination of the threads will indicate whether they are left or right handed).
With the center nut loosened, it should be backed off until it is level with the end of the shaft, this will support the shaft when the extractor is engaged.
Using a proprietary extractor (A), the mechanic must insert it to the full extent of its outer threads. Before tightening the center bolt, when the bolt is tightened against the shaft, the mechanic should tap the extractors bolt with a hammer. The shock from the hammer will separate the tappers and loosen the flywheel.
If the flywheel does not come loose the first time the center bolt is tapped, the process should be repeated; for example re-tighten the center bolt, tap with a hammer and so on until the flywheel becomes loose.
Seized Flywheels
Occasionally a flywheel will be seized to the crankshaft. This seized condition is due to the flywheel becoming loose at some time and shearing off the Woodruff key. Should the mechanic encounter this problem he may find it necessary to take the components to a specialist engineering or auto-engineering shop to have the flywheel removed. However, he should first check the availability of the components as machining may well destroy them.
Before replacing the flywheel it is good practice to lap in the surfaces. This can be accomplished by removing the Woodruff key (ensure there are no high spots around the key's location hole), applying a small amount of fine valve lapping compound and rotating the flywheel on the shaft. Both items must be thoroughly cleaned after this process to remove any dirt or swarf.
Replacing the flywheel is simply a case of locating the Woodruff key (leading edge down), and carefully pressing it onto the shaft. With the flywheel located, the center nut should be hand tightened. Next, the flywheel can be tapped onto its tapper with an oversize socket and a dead blow hammer (a lead hammer is ideal for this job). Finally, the center nut must be tightened to its recommended torque.