Coil Spring Compressor Instructions 305mm
- Share
- Issue Time
- Jul 22,2022
Summary
Coil Spring Compressor Instructions of DNT Tools,reliable automotive tool supplier from China
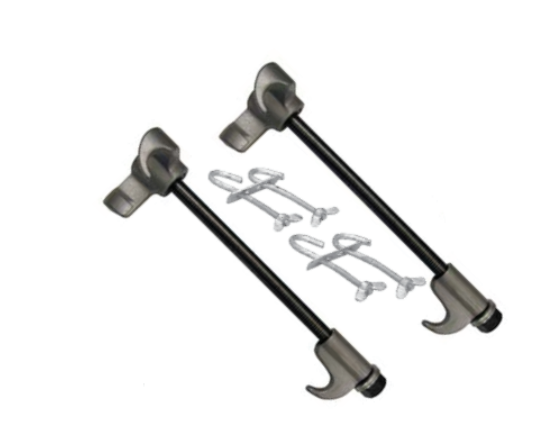
Coil Spring Compressor Tools(305mm) Instructions
|
Specifications
|
|
|
Maximum spring diameter
|
5/8 in.
|
|
maximum struct spring outside diameter
|
5.5 in.
|
Save This Manual
Keep this manual for the safety warnings and precautions, assembly, operating, inspection, maintenance and cleaning procedures.
Safety Warnings
WARNING: When using electric tools, machines or equipment, basic safety precautions should always be followed to reduce the risk of fire,electric shock,and personal injury.
General Safety Warnings
1. Read all instructions before using this tool.
2. Use as a pair only. Tighten and release evenly and slowly. Only use hand tools to tighten/release.
3. Secure spring in place with safety hooks before use.
4. Keep work area clean. Cluttered areas invite injuries.
5. Consider work area conditions. Don’t use in damp, wet, or poorly lit locations. Don’t expose to rain. Keep work area well lit.
6. Keep children away from work area. Store tool out of children’s reach
7. Store idle equipment. When not in use, tools should be locked up in a dry location to inhibit rust.
8. Don’t force the machine or tool. It will do the job better and more safely at the rate for which it was intended.
9. Use the right tool. Don’t force a small tool or attachment to do the work of a larger industrial tool. Don’t use a tool for a purpose for which it was not intended.
10. Dress properly. Don’t wear loose clothing or jewelry. They can be caught in moving parts. Protective gloves and non-skid footwear are recommended when working. Wear restrictive hair covering to contain long hair, preventing it from getting caught in machinery.
11. Use eye and ear protection. Wear ANSI-approved safety goggles during use.
12. Don’t overreach. Keep proper footing and balance at all times.
13. Maintain tools with care. Keep tools sharp and clean for better and safer performance. Follow instructions for lubricating and
changing accessories. Keep handles dry, clean, and free from oil and grease.
14. Stay alert. Watch what you are doing, use common sense. Don’t operate any tool when you are tired.
15. Check damaged parts. Before using any tool, any part that appears damaged should be carefully checked to determine that it will operate properly and perform its intended function. Check for alignment of moving parts, binding of moving parts, breakage of parts, mounting, and other conditions that may affect its operation. Any part that is damaged should be properly repaired or replaced by an authorized service center unless otherwise indicated elsewhere in the instruction manual.
16. Replacement parts and accessories. When servicing, use only identical replacement parts. Only use accessories intended for
use with this tool.
17.Do not operate tool if under the influence of alcohol or drugs. Read warning labels on prescriptions to determine if your judgment or reflexes are impaired while taking drugs. if there is any doubt, do not operate machine.
18. Use for intended purpose only. To prevent serious injury and/or property damage, only use this product to compress strut springs.
Operation
Before each use, inspect the Safety Hooks, Brackets, and the Puller Hooks on the Strut Spring Compressors. Do not use if you find any crackes or other damage

Set Up
WARNING: To prevent serious injury and/or property damage, only use this product to compress strut springs.
1. Place the Strut Assembly down on a workbench or other solid work surface.
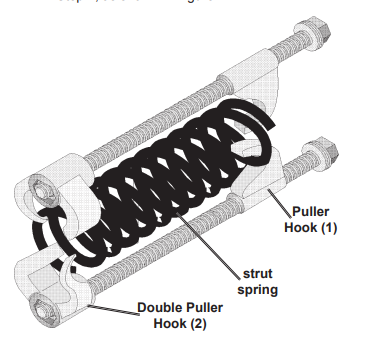
2. Examine the strut spring inside the Strut Assembly.You will need to identify areas at each end of the strut spring to attach the Puller Hooks of the Strut Spring Compressor. There needs to be enough space between the coils for the Puller hooks to fit between and still allow you enough compression to collapse the spring enough for safe removal. Ideally you will place the Puller Hooks towards the outer ends of the coil spring.
3. Adjust the Support Bar Nut (9) to move the
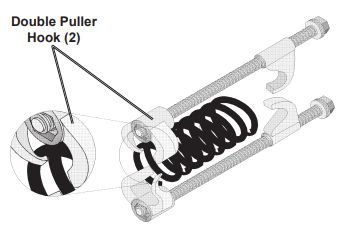
Double Puller Hook (2) to the end of the
Support Bar (3),
4. Place the Double Puller Hooks (2) around the strut spring at the spot you identified in Step 2,
6. Tighten the Support Bar Nut (9) until it contacts the Puller Hook (1).
7. Remove the Wing Nuts (4) from two of the Safety Hooks (6).
5. Adjust the puller hook to fit around the strut spring at the end opposite from Step 4. Make sure the Strut Spring Compressor is parallel (straight up and down) with the
Strut Assembly
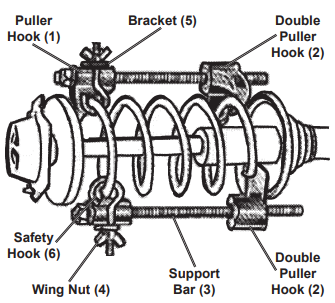
8. Place one Safety Hook (6) on each side of the Puller Hook (1) and around each strut spring, as shown in Figure 4.
9. Place the Bracket (5) over the two threaded ends of two Safety Hooks (6). The Brackets (5) should hold the two Safety Hooks (5) together next to the Puller Hook (1).
10. Thread one Wing Nut (4) onto each Safety Hook (6) then tighten the Bracket (5) against the Puller Hook as shown in Figure 4. The Wing nuts(4) should be finger tight
11. Repeat Steps 2 through 10 with the second Strut Spring Compressor Assembly.
WARNING! Always use both Strut Spring Compressors on the same spring, at the same time
Removing The Strut Springs
1. Check the Safety Hooks (6) to ensure they are installed correctly.
2. Rotate the Strut Assembly so you can easily access the Support Bar Nut (9) on each Strut Spring Compressor.
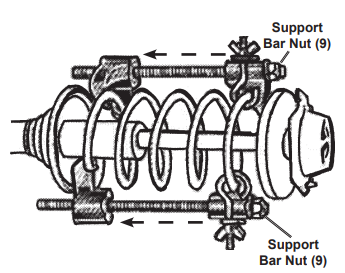
3. Begin to tighten the Support Bar Nut (9) on one Strut Spring Compressor as shown in Figure 5. Tighten the Support Bar Nut (9) about one inch, then tighten the Support Bar Nut (9) of the other Strut Spring Compressor an equal amount.
4. As you tighten the Support Bar Nut (3) on each Strut Spring Compressor, you will be compressing the strut spring. When you compress the strut spring enough to allow free play of the coil spring on the Strut Assembly, you may remove the Strut
Bearing Nut at the top of the Strut Assembly and remove the Strut Bearing and Top Hat. You can now remove the compressed strut spring.
WARNING! To reduce the pressure on the spring and maintain better stability, only tighten as much as is necessary.
5. If you have tightened the Coil Spring Compressors as far as possible and there is no free play of the coil spring on the Strut Assembly, DO NOT REMOVE the Strut Bearing Nut. Remove
the Coil Spring Compressors evenly and place the Puller Hooks further apart on the coil spring in order to compress more of the coil spring. Repeat Steps 2 through 6.
6. Do not store a compressed coil spring for ANY length of time, even if you are immediately replacing the Strut. Loosen
the Support Bar Nuts (9) on the Coil Spring Compressors EVENLY to reduce pressure
WARNING! To prevent serious injury or DEATH from the
spring suddenly launching free: Tighten the NUTS EVENLY.
Do not tighten one Strut Spring Compressor all at once.
Cleaning, Maintenance, and Lubrication
Before and after each use, inspect the Safety Hooks, Brackets, and the Puller Hooks on the Strut Spring Compressors. Do not use if you find any cracks or other damage.
NOTE: Keep thread clean and lubricated at all times